 If you’re running a WordPress self-hosted website, you are probably aware that WordPress’s popularity has caused it to become a frequent target for hackers. Aside from keeping your WordPress software up-to-date (which is the most important step you can take to secure your website), it is critical to make sure your site’s folder permissions are correct.
Folder permissions dictate who can make changes to files and folder on your web server. These permissions can be easily (and often accidentally) changed, allowing an intruder to access and make changes to your content and settings.
WP Security Scan is a plugin for WordPress that can quickly detect security flaws and advise you how to fix them. Along with checking critical folder permissions, WP Security Scan can create secure passwords, secure your database, hide your WordPress version (which prevents version-specific hacks), and protect your administrator account.
To get started, install WP Security Scan from your self-hosted WordPress installation by clicking Plugins –> Add New and search for ‘WP Security Scan’ (in newer WordPress versions), or by downloading the plugin from the WordPress Plugins Directory and manually uploading it to your server’s wp-content/plugins folder.
Once you have installed and activated the plugin in WordPress, click the newly created Security button on the Dashboard menu.
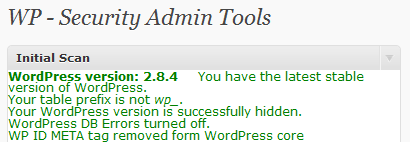
The main page for WP Security Scan will show critical security information in the top left corner of the screen (secure elements are shown in green, insecure elements are displayed in red with additional information). The right side of the screen will display technical information about your web server.

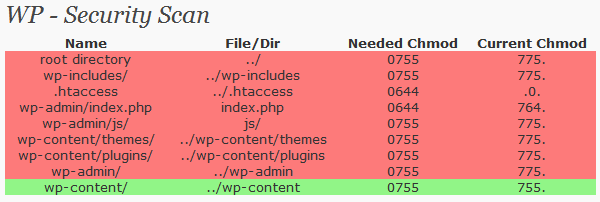
The next important step is to verify your folder permissions. Under the Security tab on your WordPress dashboard, click Scanner. This will display a list of critical WordPress folders, the permission the folders should be set at for maximum security (listed as “Needed Chmod”, and the folders’ current access level. Folders with incorrect permissions will be displayed with red highlighting and secure folders will be displayed with green highlighting.

The easiest way to change your file and folder permissions is to use a program such as WinSCP or Filezilla to access your web server. In these programs, you can simply right click a folder and select “Change Permissions”. This will bring up a dialog box where you can type in the number listed in the “Needed Chmod” field of the WP Security Scanner.
Advanced users can optionally change their file and folder permissions by logging into their web server using a shell client such as Putty and manually edit their permissions with the chmod command.
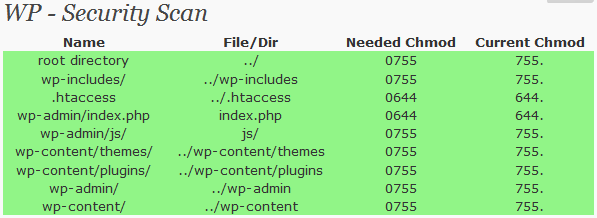
Once you have corrected the incorrect file permissions, run the Security Scan again. You should be presented with friendlier results as shown below.

WP Security Scan has plans to release additional features in the future including a single-click option to change file and folder permissions, testing for XSS vulnerabilities, intrusion detection/prevention, and lock out on multiple incorrect login attempts.
Have any other tips to keeping your WordPress self-hosted website secure? Let us know by commenting below.

Leave a Reply
You must be logged in to post a comment.