 Most hard drives come with multiple partitions – which can be thought of as individual hard drives within your main hard drive – to separate a hard drive into multiple sections. Partitions are very useful if you want to separate your operating system from your documents (allows for easier OS reinstallation), and most manufacturers include a recovery partition in lieu of a recovery disc with new computers.
If you want to create, delete, format, or resize hard drive partitions, Easeus Partition Master lets you do this quickly and for free.
Before you begin: As with any software that modifies your hard drive, partitioning can cause data loss if something goes wrong. Be sure to backup any important data before following this guide.
Step 1: Download and install Easeus Partition Master.
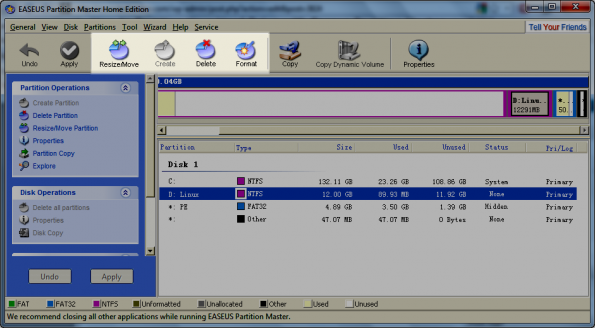
Step 2: Open the program. You will see a horizontal image corresponding to your hard drive’s current partitioning, as well as a detailed list of the current partitions. From here, you can select any partition and use the buttons at the top of the screen
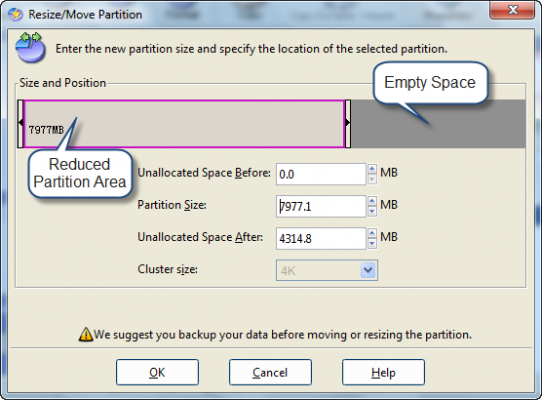
Resizing Partitions: If you have multiple partitions and want to make one larger, you must first reduce the size of one by clicking the Resize/Move button and select a smaller size. To enlarge the other partition, select it and select Resize/Move again and increase it to fill the extra space you created by shrinking the other. The graphical sliders can also be used to adjust the partition’s size.
Be sure to note that the partitions are listed in MB, so if you want to calculate how many gigabytes you will have, divide it by 1024.
Deleting a Partition: If you have multiple partitions and want to remove one, just select it then click the Delete button. Remember that deleting a partition removes all data stored in it, so be careful with this one.
Creating a Partition: To create a partition, select any unpartitioned space and click the Create button. If you don’t have any unpartitioned space, you will first have to resize or delete an existing partition.
Formatting a Partition: Easeus Partition Master only lets you format partitions as NTFS or FAT32, so if your intention is to create a Linux partition (with the ext file system), you’ll want to use free software like GParted which can be used as a LiveCD and also comes included with the Ubuntu LiveCD.
 Step 3: Once you’ve configured your partitions, you must click the Apply partition to actually make the changes. You will have to restart your computer, and while it is restarting you may see several screens regarding the partitions being modified. Once it restarts, you should have your partitions configured to your liking!
Easeus Partition Master is free for personal use and supports Windows 2000 Professional, Windows XP 32-bit, and Windows Vista 32-bit. If you’re looking for 64-bit support, it’s offered in the Professional and Server editions of the software. I have tested Easeus Partition Master in Windows 7 and have experienced no problems.
Have a different method of managing your computer’s partitions? Share it with us in the comments.


Leave a Reply
You must be logged in to post a comment.