
![]() PHP, MySQL, and Apache have become prominent ingredients in small and large website alike. After all, they are free, robust, and they each have a large community of supporters from which to troubleshoot. However, unless you have a server on which to develop your application, you won’t be able to enjoy these platforms or the, “Hey! Look what I did!” sense of satisfaction inherent to web app development. Many of us don’t have access to a hosted server with these components installed, so how do we go about setting up a local server on our personal PCs?
PHP, MySQL, and Apache have become prominent ingredients in small and large website alike. After all, they are free, robust, and they each have a large community of supporters from which to troubleshoot. However, unless you have a server on which to develop your application, you won’t be able to enjoy these platforms or the, “Hey! Look what I did!” sense of satisfaction inherent to web app development. Many of us don’t have access to a hosted server with these components installed, so how do we go about setting up a local server on our personal PCs?
Many developers will argue that the best way to create a testing server is to install these packages individually from each organization’s homepage (here, here, and here), since it is the only way to be completely certain of the packages’ configurations. In that sense, I agree, but there are a number of pre-packaged installers that will get you to basically the same destination while alleviating most of the headaches that oftentimes go hand-in-hand with manual installation.
Some popular PHP/MySQL/Apache bundles include:
For the purposes of this guide, I will be using WAMP Server 2.0i which, at the time of this post, includes Apache 2.2.11, MySQL 5.1.36, and PHP 5.3.0.
To setup a testing server on your PC, you will need:
- WAMP (download link)
- A PC with Windows XP or later
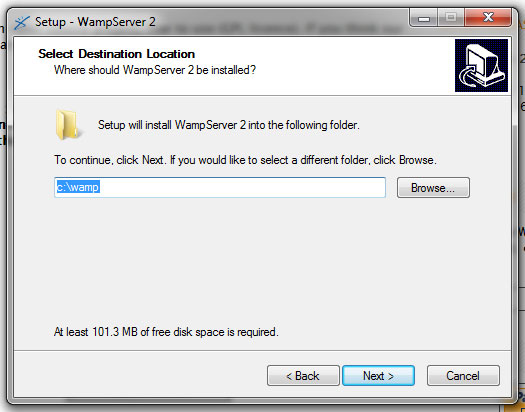
The installation dialog (shown below) is pretty straightforward. You will be asked for a location to which you will install the PHP, MySQL, and Apache directories. While the location you choose doesn’t particularly matter, I chose to save it to C:\wamp simply because it allows for easy access of the configuration from a command prompt, should that become necessary.
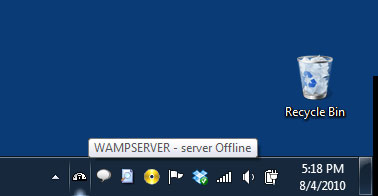
 Installation completes fairly inconspicuously, and you’re left with a WAMP shortcut on your Desktop, as well as a tiny gauge-looking icon on your Taskbar.
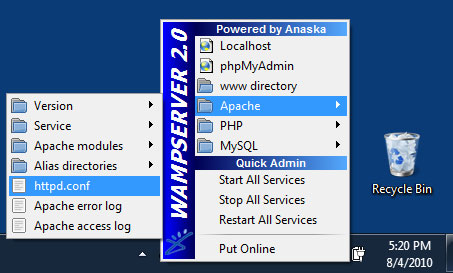
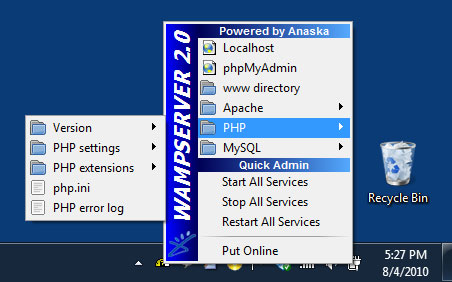
 The control panel (shown below) is a major convenience that makes WAMP such a joy – you can access most worthwhile aspects of your server configuration without messing around in the guts of your configuration directories. The server can be stopped, started, and restarted from this panel, and many options for each component can be modified.
Right off the bat you’ll want to designate the directory that Apache uses as the root directory for your server. This can be done by editing the httpd.conf file, as shown below.
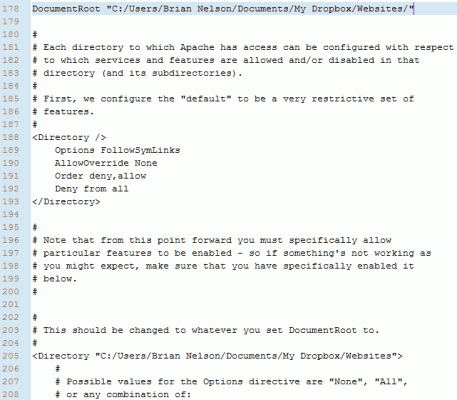
 Within the Apache configuration file, httpd.conf, you’ll want to look for two lines of code – one that begins DocumentRoot and one that begins <Directory>. In an unaltered configuration file, you’ll find these on lines 178 and 205, as shown below. The DocumentRoot property tells Apache where to find your site files and can be left as is, or changed to something more convenient. I have my site folder set to a directory within my Dropbox. Be mindful that you only use forward slashes, or Apache will get confused and download in its pants.
The same location used for DocumentRoot should be pasted into the <Directory> line below it (line 205 in the picture). Save the file (File > Save) and close the document.
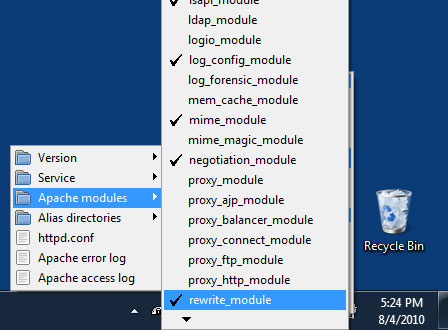
 WAMP offers a convenient way of showing which modules are activated in your configuration in the Apache modules menu. I should note that by default the rewrite_module (often used to beautify URLs) is not activated. Many PHP programs, such as WordPress and CakePHP rely on this module, so it may be worth your while to activate it.
 Similar to the Apache configuration menu, PHP settings and extensions can be modified in the WAMP control panel. By default, many commonly used extensions are not activated, including Curl. Simply go through the list of extensions in the PHP extensions folder of the control panel and select the ones you wish to use. You can also directly access the php.ini configuration file from this folder, if necessary.
 Now that the server is configured, you may want to make a test file to see if everything is working properly. We’ll call our test file test.php and we’ll place it in the site folder (root) designated in the httpd.conf file I referenced earlier. Your test.php file should contain the following code:
[code lang=”php”]
<?php phpinfo(); ?>
[/code]
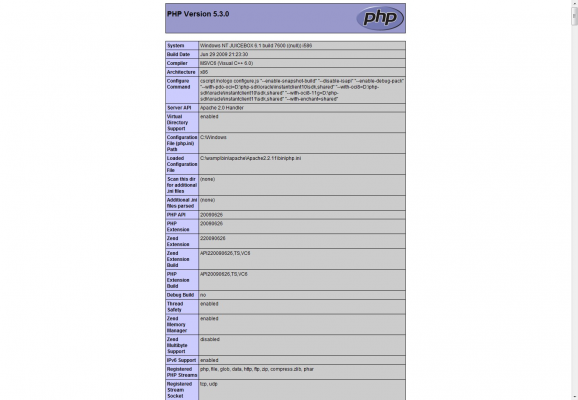
Save your file, go to your WAMP control panel, and select Restart All Services. Wait just a few seconds for the server to reset (which employs all of the changes we made) and direct your browser to http://localhost/test.php . If your configuration is working properly, you will see a page outlining your PHP configuration, which indicates that both Apache and PHP are working properly (below).
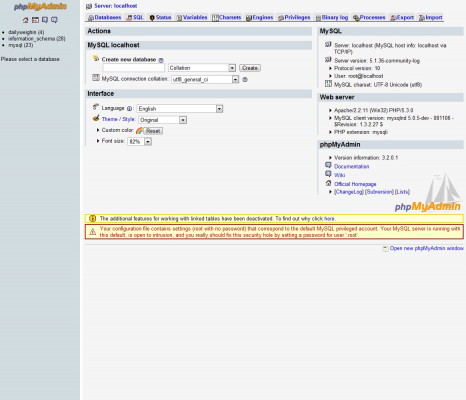
 Finally, to test that MySQL is working properly, direct your browser to http://localhost/phpmyadmin (the administrative area for your databases). If you see the page below without errors, you are ready to roll. Note that by default the root password is left blank. If you plan to have your MySQL configuration remotely accessible, you can change and add users in the user table in the mysql database.
 So there you have it – This local server configuration will allow you to develop rich applications without the fuss and corruption of constantly FTP-ing files to your hosted server. WAMP simplifies the process of installing and maintaining services for your local testing server. Enjoy!
Leave a Reply
You must be logged in to post a comment.