The iPad has many uses and one its features is presenting slideshows of your photos. In fact, slideshows look fabulous on the iPad. How do you create a slideshow on the iPad? You can create slideshows through the built-in Photos app or using a third-party app.
Adding photos to your iPad
Whether using Apple’s Photos app or a third-party app, you must have the photos you plan to use on your iPad. You can load photos from a memory card using the Camera Connection Kit sold by Apple, or you can load them through iPhoto and iTunes.
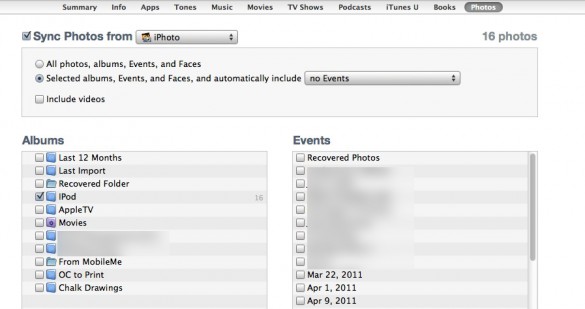
To load photos using iPhoto you need to have an album in iPhoto with the photos you want to add to your iPad. Next,with you iPad connected to the computer, go to iTunes and select your iPad in the devices list on the left. Choose the “Photos” tab and click the options that allow you to load photos from specific albums. Choose the specific album (or albums) you want to load onto your iPad.
For the purpose of making a slideshow it is a good idea to have the album specifically assigned for your slideshow. It should not contain any other photos in it. You can use another album for that.
Now you are ready to make your slideshow.
Making a slideshow with the built-in Photos app
Let’s start with the easiest and quickest method based on the idea that you loaded your photos through iPhoto. After synching your photos, open the Photos app on your iPad. The photos will be grouped into an album with the same name as the one you created in iPhoto. Open that album.
On the top right of the screen you will notice a “Slideshow” button. Tap this button and another window will open. In this window you can set basic setting for the slideshow such as a theme. Pick your settings and play the slideshow.
If you aren’t loading your photos through iPhoto, but are loading from your camera the process is just as easy. Instead of making and loading a playlist through iPhoto you make the album in the Photos app. However, you do need at least iOS 5 installed on your iPad. Earlier versions of iOS do not allow you to create albums on the iPad.
Next, open the Photos app on your iPad. Find the photos you want to use and tap the curved arrow in the top right of the screen. Tap all of the photos you want in the slideshow. Now tap the “Add To” button and choose “New Album.” Enter a name for the album and these photos will now be in that album.
To create the slideshow, go to the album and follow the same steps laid out above for playing a slideshow in the Photos app.
One important note is that you are not creating any specific slideshow file when you follow these methods outlined above. You are only using the Photos app to play a select group of photos in a slideshow. To actually create a slideshow file you will need to use one of several apps available in the App Store.
Creating slideshows in a third-party app
If you do a search for “Slideshow” in the iPad App Store you will be presented with numerous apps that can create a slideshow for you. Each one will have different features and you will have to read the features and the reviews and decide which one might work for you.
You can also consider using Keynote to create slideshows, which another great option on the iPad. It is a lot more complicated than using the method of using the Photos app, but it does give you more control. You can choose transitions on a per photo basis, add music if you want, and export it from the iPad to your Mac.
Whichever app you choose to use, you will still need to load photos to the Photos app using one of the methods described above. All of these types of apps access the photos stored in your Photos app.
Now you have several options for creating slideshows on your iPad. If you have a preferred technique or app for creating slideshows leave a comment below!


Leave a Reply
You must be logged in to post a comment.