 I recently discovered Visual Studio Achievements, which as the name indicates, adds video game-style “achievements” to Microsoft’s premiere IDE while you code. Visual Studio Achievements was even created by Microsoft’s Channel9 team, so you know it’s the real deal.
Some of the unlockable achievements include positive awards like “Add 10 regions to a class. Your code is so readable, if I only didn’t have to keep collapsing and expanding!” and negative awards such as “Write a single line of code at least 300 characters long. Who needs carriage returns?”. With leaderboards and fun icons, Visual Studio Achievements adds a little fun to your programming experience.
Many of the achievements require a Microsoft tool called FxCop to be installed for them to be unlocked. FxCop is a utility that can analyze your source code and provides feedback on possible design, localization, performance and security improvements. Unfortunately, if you head to the FxCop download page, you’ll quickly learn than the FxCop “download” is actually a text file that tells you to install another file to actually get the application.
When you open the FxCop text file, you’ll be presented with the following information.
FxCop Installation Instructions
1. Download the Microsoft Windows SDK for Windows 7 and .NET Framework 4 version 7.1.
2. Run %ProgramFiles%\Microsoft SDKs\Windows\v7.1\Bin\FXCop\FxCopSetup.exe to install FxCop.
I know, I was surprised too. For this to work, I need to install the Windows SDK, then install another installer? Well you’re in luck – I took the time to figure out what files were needed so you can install FxCop as quickly as possible. Just follow my instructions below.
Note: This guide is only required if you are using Visual Studio 2010 Professional. If you have Visual Studio 2010 Premium or Ultimate installed, FxCop will already be included with your IDE.
How to install FxCop
Step 1. Download the Microsoft Windows SDK installer.
Step 2. Run the installer. Click “Next” until you get to the “Installation Options” screen.
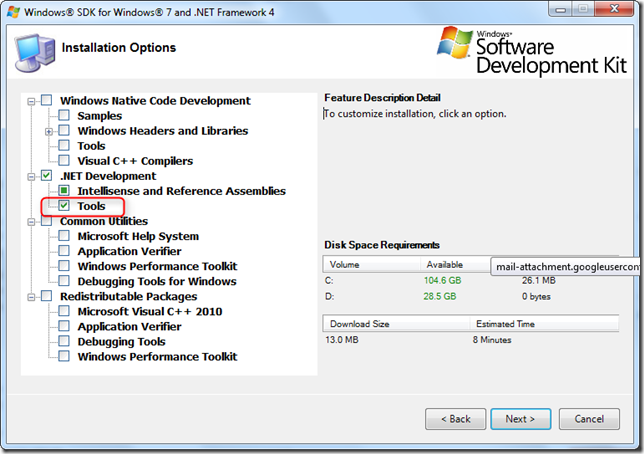
Step 3. In the Installation Options screen, select only “Tools” under the .NET Development section. You’re free to install other features as well, but “Tools” is the only item that will include the FxCop installer.

Step 4. Click “Next” and continue following instructions until installation is complete.
Step 5. After the installer finishes, navigate to C:\Program Files\Microsoft SDKs\Windows\v7.1\Bin\FXCop.
Run the installer in that folder, FxCopSetup.exe.
After installing FxCop, you’re finished! You can now enjoy the full features of both FxCop and Visual Studio Achievements.

Leave a Reply
You must be logged in to post a comment.